Sunday, December 9, 2012

Christmas Wreath Cookies

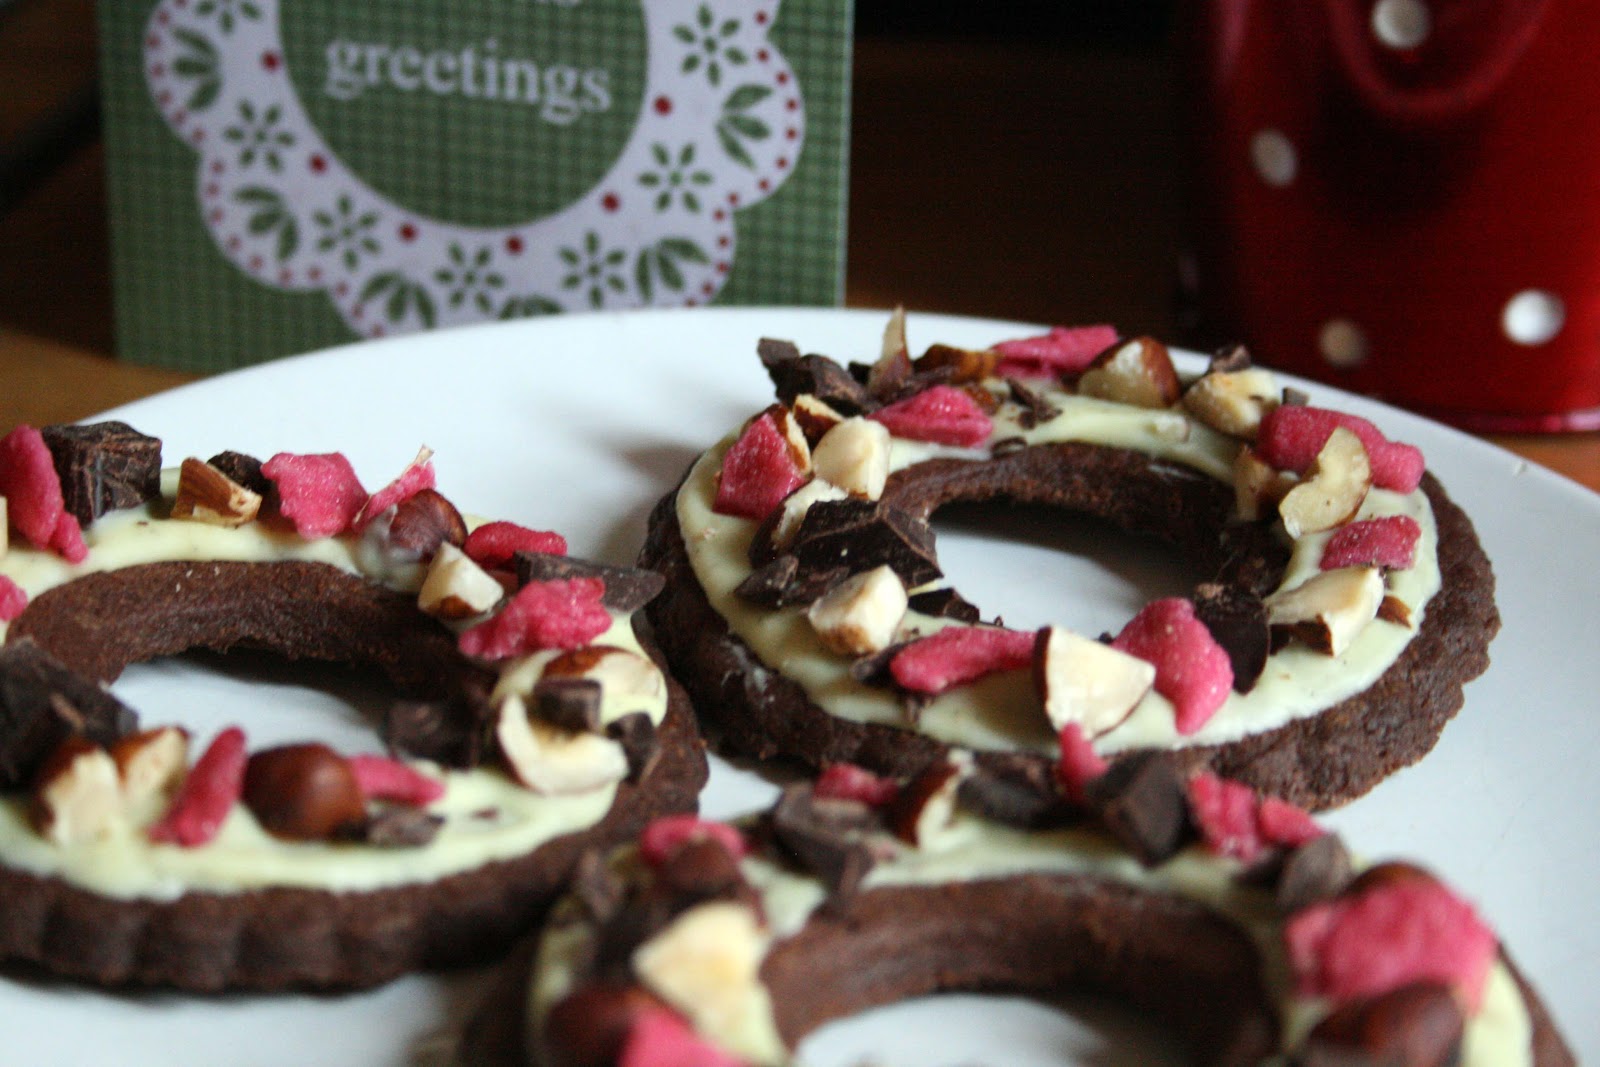
These Christmas Wreath Cookies wouuld be great to serve to any guests that pop round during the festive period or alternatively they'd make really lovely Chirstmas gifts.
You can serve your cookies to guests as they are or alternatively for a bit of fancy presentation you could also thread them with some Christmassy ribbon and then display them on a mini christmas tree or on a twig tree such as the one below designed by David Stark.
These cookies are simple to make. You can use any cookie recipe you like so you can easily vary the flavour to suit your tastes. My cookies are chocolate with a hint of cinnamon but an alternative could be to make vanilla cookies and then melt dark chocolate to contrast.
To cut out the cookies I used an 8.5cm fluted cuter and then cut out a 4cm ring in the centre with a round cutter.
Then to decorate it was simply a case of drizzling melted white chocolate on each cookie. I used a piping bag to put the chocolate on the cookie and then the back of a spoon to spread it around a little, it was quite difficult to get perfect edges. Then whilst the chocolate is still wet each cookie was sprinkled with chopped hazelnuts, dark chocolate and crystallised rose peteals. The rose petals give a lovely contrasting colour to the cookies and they are actually rather tasty! However, a Christmassy alternative to the rose petals could be chopped sour cherries.
The first challenge I'm entering my chocolate wreath cookies into is Tea Time Treats hosted by Karen at Lavender and Lovage and Kate at What Kate Baked. Their theme is chocolate as there is always an abundance of the sweet stuff about at Christmas.
I'm also entering my cookies into this month's We Should Cocoa challenge as I added a teaspoon of cinnamon to the chocolate cookie recipe to give it a bit of festive spice. The theme for WSC this month is cinnamon and chocolate so these modified cookies fit the theme perfectly. I usually a stickler for following recipes to the letter, so adding a little cinnamon in place of a small amount of flour was quite adventurous for me! WSC is hosted by Choclette at Chocolate Log Blog and Chele at Chocolate Teapot.
 
Ingredients

245g plain flour
25g cocoa powder
1tsp cinnamon
250g unsalted butter, chilled and diced
140g icing sugar
2 egg yolks
2 tsp vanilla extract
125g white chocolate, broken into pieces
75g dark chocolate
75g unblanched hazelnuts
Crystallised rose petals

The initial recipe suggested making the cookie dough by hand but I cheated and used a food processor...so you can choose either method! Before you start preheat your oven to 180c/160c fan/
gas 4.

Put the flour, cocoa powder, cinnamon and diced butter into a bowl and rub together until it ressembles fine breadcrumbs...or blitz it in your food processor. Add the egg yolks, icing sugar and the 2 teaspoons of vanilla extract. Mix this in well until you have a smooth dough and then wrap in clingfilm and pop in the fridge to chill for at least 30 minutes.

Lightly dust your work surface with flour and roll out the dough. This recipe makes about 16 cookies. To cut them out use an 8.5cm fluted cutter and then cut out a smaller round circle from the centre of each cookie using a 3 or 4cm cutter. Place the cookies on a greased baking tray or line your tray with greaseproof paper before putting them on. Make sure you leave sufficient space around each cookie.

Place the cookies in the preheated oven for around 15 minutes but make sure you keep an eye on them as they may catch a little before that. They should begin to darken around the edges when ready. Cool on a wire rack.

To decorate, melt the white chocolate in a bowl over a pan of simmering water. Whilst it is melting use a potato peeler to create dark chocolate curls. Once melted the white chocolate should be drizzled around each wreath cookie. I used a piping back to make it easier and neater and then spread the white chocolate with the back of a spoon. When you're happy with this sprinkle each cookie with a mixture of the hazelnuts, dark chocolate curls and rose petals. I would recommend completing one cookie at a time otherwise by the time you come to sprinkling on the top, the chocolate may have already set and then the nuts and so on won't stick.

* Adapted from Hamlyn's 200 Christmas Recipes

Wednesday, December 5, 2012

Temari Cakes at Peggy Porschen

Last Saturday I was lucky enough to visit the Peggy Porschen Academy for the first time. I was attending the Temari Cakes course with Maki Searle who is famous in cake circles for her innovative spherical shaped cakes.
Maki of Maki's Cakes took us through the process for making Temari cakes step by step. These gorgeous cakes are perfect for many occasions but are particular popular for weddings...although I'm not sure how I'd feel about making 100 of them! :-)
They're also ideal for Christmas...just make them in festive colours...et voila...you have Christmas baubles!
On the day we made two sizes of Temari cake and also the lovely parcel cake below. We made the spotty bow by cutting out small circles of green and laying them on top of the red before gently rolling over them. You can see the same technique here, which I used to make Pudsey Bear's bandana.
So what does Temari actually mean I hear you ask...or even if you didn't I'm going to tell you anyway! Temari are traditional Japanese hand balls for kids to bounce and dribble. It's not only cake here...you get education too ;-)
To make the balls, the cakes are baked in a half sphere silicone mould. The cakes are then levelled and a small amount of cake is scooped out with a melon baller. Half the spheres are filled with jam and half with buttercream and they're then chilled. Two halves are then put together before the whole thing is lighly coated in buttercream.
When thoroughly chilled the balls are covered in marzipan as you can see Maki doing in the picture above. They're then covered in sugarpaste icing.
The finishing touch is the addition of a little lustre dust, some glitter and piped royal icing using a 1.5 nozzle. I've also seen Temari balls with little snowflakes cut out of flowerpaste, hardened and then stuck on...very wintery and they'd make a lovely Chirstmas present.
If you'd like to know more about how to make Temari cakes then Maki explains the process in her book Cakes to Fall in Love With.
These cakes really are beautiful and I'd love to find the time to make some more. They're so unusual and very original.
To finish any visit to the academy or if you just happen to be passing, the lovely Peggy Porschen Parlour is just across the road. I had a sticky toffee cupcake which was a moist date and walnut sponge with a creamy caramel centre and a toffee frosting. I don't normally rave about such things but I would go so far to say that this was one of the best cupcakes I've ever eaten...truly delicious! I also saved a sugar plum cupcake for the next day which was a tasty combination of plum and cinnamon.
As for my visit to the academy, I did enjoy my day and the Temari cake instruction but I do find the price to be extremely high considering I have paid less for courses elsewhere and the experience has been just as good. That being said...I'm so pleased to have learnt how to make Temari cakes and some other courses use dummies for their Temari instead of real cake so it was worth it for that alone!

Sunday, December 2, 2012

Nigella's Sticky Gingerbread

With the start of December, it's now officially the Christmas season...so bring on the Christmas baking! I'm so excited to have finally made this Sticky Gingerbread...I've only been waiting a year! I just couldn't resist the little deer and the spruce trees...the perfect festive touch.

This is also a recipe from Nigella's Christmas book, so it's ideal to get the ball rolling for this month's Forever Nigella which I'm thrilled to be hosting.
This gingerbread is full of gorgeous flavours including fresh and ground ginger, cinnamon, ground gloves, black treacle and golden syrup. Not only does it taste delicious but it will also fill your house with the wonderful aroma of Christmas.
This is a really easy recipe, all you need to do is melt all the ingredients listed above in a saucepan, along with some dark muscovado sugar and some butter. Once it's all melted together, milk, eggs and some bicarb of soda dissolved in warm water is added and the whole thing bubbles up a little. This mixture is then poured into a bowl containing flour which all gets mixed together...et voila!
It's a very runny batter but that just adds to the lovely sticky nature of this bake. It's soft and light when baked and all the spices come through a treat! Nigella also suggests a frosting of 175g icing sugar, a tablespoon of lemon juice and one of warm water if you're going to make this for a bake sale or some such thing...although she prefers the simplicity of the un-iced version.
If you're making any festive Nigella recipes this month then do enter them into Forever Nigella #21. As mentioned I'm hosting this month but the home of Forever Nigella is at Maison Cupcake. We'd love to see your creations both sweet and savoury!

Ingredients

250g butter
200g golden syrup
200g black treacle
125g dark muscovado
2 tsp finely grated ginger
1 tsp ground ginger
1tsp ground cinnamon
1/4 tsp ground cloves
1 tsp bicarb of soda, dissolved in 30 mls warm water (2 tbsp of water)
250ml full fat milk
2 eggs, beaten
300g plain flour

Preheat the oven to 170c/150c fan/gas 3 and prepare a 20 x 30cm baking tray by lining it with baking paper.

Sift the flour into a large bowl ready for later.

Next melt the following in a medium sized saucepan: butter, sugar, golden syrup, black treacle, cinnamon, cloves and the fresh and ground ginger. When this mixture has melted take it off the heat and add the milk, bicarb of soda with water and the beaten eggs.

These wet ingredients can then be poured on to the flour and the whole mixture should then be beaten until well combined. I ended up with quite a few pockets of flour which I had to beat out. The mixture will be extremely runny but don't fear this is how it is supposed to be. Pour it into the prepared tin and bake for 45 minutes. Mine only took 45 minutes, you don't want to overbake otherwise the gingerbread may lose it's stickiness.

When ready, remove from the oven and place the tin on a wire rack to cool. This recipe will cut into about 20 squares and will keep for up to 2 weeks in an airtight tin. You can also freeze it for  up to 3 months should you so wish.

* Adapted from Nigella Christmas by Nigella Lawson

Saturday, December 1, 2012

Forever Nigella #21 - Christmas

Welcome to Forever Nigella. I'm thrilled to be hosting this month...and the theme is Christmas! Nigella even has a whole book devoted to the subject.

The home of Forever Nigella is at Maison Cupcake. Creator Sarah describes Forever Nigella as 'the only regular blogging event to share your culinary moments dabbling with the domestic goddess'. So be your creation sweet or savoury we'd love it if you could join us for this month's challenge. This may be Laura Loves Cakes but you are most welcome to enter absolutely any Christmassy Nigella recipe...even your Christmas lunch if the recipe came from the domestic goddess herself!
Why not dig out all of your Nigella cookbooks and magazine recipes or check out some online sources and join in with this month's challenge.

Forever Nigella Rules

Forever Nigella #21 is being hosted by Laura of Laura Loves Cakes. This month’s challenge is to prepare and blog any Nigella Lawson recipe which is suitable for Christmas. Forever Nigella is organised by Sarah at Maison Cupcake.

1. Blog your entry by Sunday 30th December 2012:

a) the current Forever Nigella badge
b) a link to this announcement post
c) a link to the Forever Nigella page at Maison Cupcake:
http://blog.maisoncupcake.com/forever-nigella

n.b. posts must have been published since the announcement post. Archived posts need to be re-published afresh if you wish to submit.

2. Remember copyright.

You must NOT reproduce Nigella’s recipes verbatim. Tell us which book it is from and/or link to it online. If you’ve adapted the recipe in some way i.e. changed at least two ingredients or amended the method then it’s ok to publish the a recipe in your post but you MUST write directions in your own words.

3. Submit your post

Use the linky tool or email me at lauralovescakes@yahoo.co.uk cc’ed to sarah AT maisoncupcake DOT com.

The Forever Nigella page shows a list of online Nigella resources, future hosts and links to past themes and round ups.

Tweet your post: #forevernigella @MaisonCupcake @Lauralovesbakes