Showing posts with label Cookies. Show all posts

Monday, May 6, 2013

3D Dinosaur Cookies

I've been looking forward to making these 3D dinosaur cookies for a little while now and with a long weekend upon us, it seemed like the perfect opportunity. I bought the cutters from Folly Home, I made the stegosaurus and the T-Rex but you can also get a brachiosaurus and a triceratops!
These do take a little bit of time to make but the end result is worth the effort. They would also make a lovely gift for a little boy!
Each set comes with several different cutters, you need to make each of the cookies and then when they're cool you can fit them all together to make your 3D dinosaur. I used this basic biscuit dough from the BBC as I couldn't find my usual recipe. The cookies tasted great but they were quite fragile so it is important to be really careful not to break any of the pieces. Another tip is to ensure that the little slots on each cookie are suitably opened before baking, if they're too close when they go in then the slots will be too narrow to fit the cookies together. To avoid the cookies spreading too much when baking I put them in the freezer (already cut out) for 5-10 minutes on the baking tray to firm up the butter.
 
One top tip I would recommend is using a cookie spatula. By using the spatula you can easily pick up your cookies without altering the shape, as sometimes the cookies can become misshapen. Also after using a cookie cutter, you may end up with some slightly rough edges, to give a neater finish, pick up the cookie and gently pat down these edges or run your finger around the edge...but be careful not to change the shape again.
You can leave the cookies undecorated but I like the idea of lots of different coloured dinosaurs, so I decorated them using royal icing and the flood filling technique. If you want to know more about how to do this, I previously briefly outlined the process when I made Love Heart Cookies. Once the royal icing on these dinosaurs had set over night, I secured the legs on with a little more icing.
I'm entering these 3D dinosaur cookies into this month's Tea Time Treats challenge which is hosted alternately by Kate from at What Kate Baked and Karen at Lavender and Lovage, this month it's Karen's turn. The theme for May is Biscuits and Cookies.

Sunday, December 9, 2012

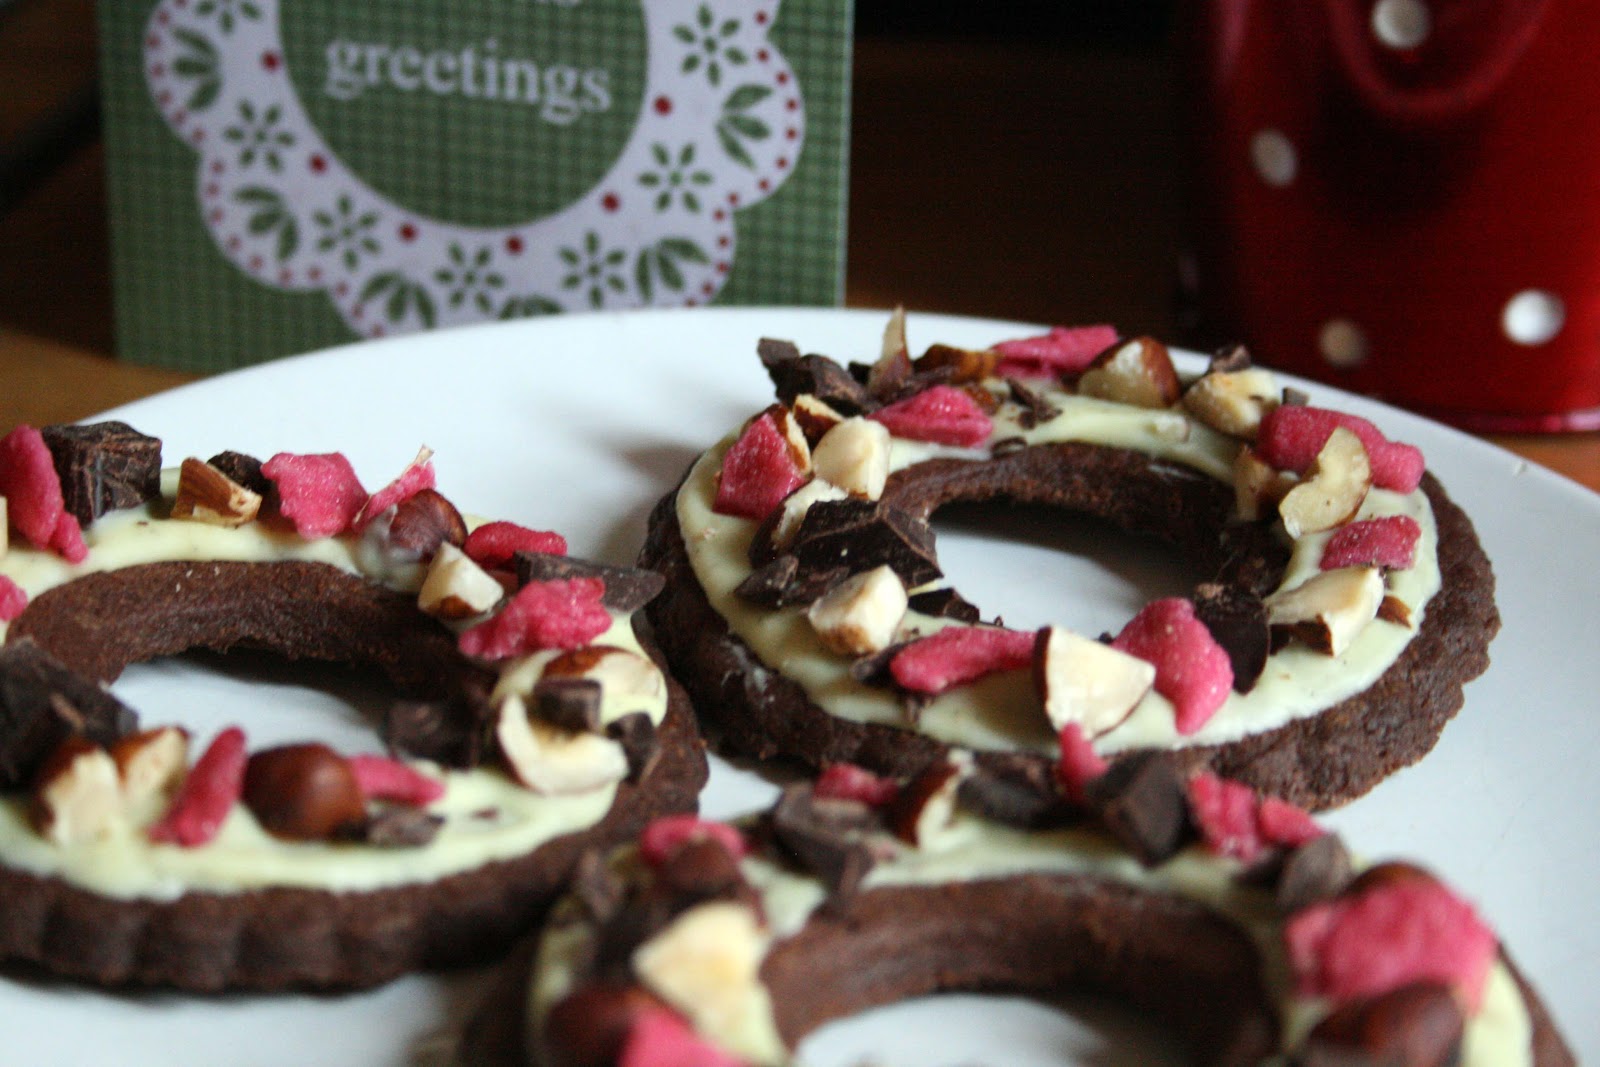
Christmas Wreath Cookies

These Christmas Wreath Cookies wouuld be great to serve to any guests that pop round during the festive period or alternatively they'd make really lovely Chirstmas gifts.
You can serve your cookies to guests as they are or alternatively for a bit of fancy presentation you could also thread them with some Christmassy ribbon and then display them on a mini christmas tree or on a twig tree such as the one below designed by David Stark.
These cookies are simple to make. You can use any cookie recipe you like so you can easily vary the flavour to suit your tastes. My cookies are chocolate with a hint of cinnamon but an alternative could be to make vanilla cookies and then melt dark chocolate to contrast.
To cut out the cookies I used an 8.5cm fluted cuter and then cut out a 4cm ring in the centre with a round cutter.
Then to decorate it was simply a case of drizzling melted white chocolate on each cookie. I used a piping bag to put the chocolate on the cookie and then the back of a spoon to spread it around a little, it was quite difficult to get perfect edges. Then whilst the chocolate is still wet each cookie was sprinkled with chopped hazelnuts, dark chocolate and crystallised rose peteals. The rose petals give a lovely contrasting colour to the cookies and they are actually rather tasty! However, a Christmassy alternative to the rose petals could be chopped sour cherries.
The first challenge I'm entering my chocolate wreath cookies into is Tea Time Treats hosted by Karen at Lavender and Lovage and Kate at What Kate Baked. Their theme is chocolate as there is always an abundance of the sweet stuff about at Christmas.
I'm also entering my cookies into this month's We Should Cocoa challenge as I added a teaspoon of cinnamon to the chocolate cookie recipe to give it a bit of festive spice. The theme for WSC this month is cinnamon and chocolate so these modified cookies fit the theme perfectly. I usually a stickler for following recipes to the letter, so adding a little cinnamon in place of a small amount of flour was quite adventurous for me! WSC is hosted by Choclette at Chocolate Log Blog and Chele at Chocolate Teapot.
 
Ingredients

245g plain flour
25g cocoa powder
1tsp cinnamon
250g unsalted butter, chilled and diced
140g icing sugar
2 egg yolks
2 tsp vanilla extract
125g white chocolate, broken into pieces
75g dark chocolate
75g unblanched hazelnuts
Crystallised rose petals

The initial recipe suggested making the cookie dough by hand but I cheated and used a food processor...so you can choose either method! Before you start preheat your oven to 180c/160c fan/
gas 4.

Put the flour, cocoa powder, cinnamon and diced butter into a bowl and rub together until it ressembles fine breadcrumbs...or blitz it in your food processor. Add the egg yolks, icing sugar and the 2 teaspoons of vanilla extract. Mix this in well until you have a smooth dough and then wrap in clingfilm and pop in the fridge to chill for at least 30 minutes.

Lightly dust your work surface with flour and roll out the dough. This recipe makes about 16 cookies. To cut them out use an 8.5cm fluted cutter and then cut out a smaller round circle from the centre of each cookie using a 3 or 4cm cutter. Place the cookies on a greased baking tray or line your tray with greaseproof paper before putting them on. Make sure you leave sufficient space around each cookie.

Place the cookies in the preheated oven for around 15 minutes but make sure you keep an eye on them as they may catch a little before that. They should begin to darken around the edges when ready. Cool on a wire rack.

To decorate, melt the white chocolate in a bowl over a pan of simmering water. Whilst it is melting use a potato peeler to create dark chocolate curls. Once melted the white chocolate should be drizzled around each wreath cookie. I used a piping back to make it easier and neater and then spread the white chocolate with the back of a spoon. When you're happy with this sprinkle each cookie with a mixture of the hazelnuts, dark chocolate curls and rose petals. I would recommend completing one cookie at a time otherwise by the time you come to sprinkling on the top, the chocolate may have already set and then the nuts and so on won't stick.

* Adapted from Hamlyn's 200 Christmas Recipes

Sunday, June 17, 2012

England Footballer Cookies

To celebrate England's 3-2 win over Sweden on Friday night I have immortalised the team in biscuit form. The only downside to the win is that I can't make a joke about my biscuit team playing better than England do!! If you look closely there's also a mysterious new member of the team...
This is my second entry into our new Calendar Cakes Challenge...my first being these Lime and Vodka Russian Doll Cakes. I'm co-hosting the challenge with Dolly Bakes, so check out her blog for more info on this month's theme: Euro 2012.
To make these cookies, you can use any cookie dough recipe such as this one from BBC GoodFood and the cookie cutter came from Cakes, Cookies and Crafts. These cookies would also be great for a young football fan's birthday, they could be decorated in any team's kit as required!
Once the cookies are baked, you just need to make some royal icing which is fairly stiff. This can be used to pipe an outline for your footballer. The icing should then be made a little runnier by adding water. To flood fill the cookies, put the icing in a small piping bag and snip off the end, fill the outline with icing and use the end of the piping bag to push it out to the edges...simples!

Sunday, May 13, 2012

Window Cookies

You wait ages for a cookie post to come along and then three come along at once! This is my third cookie post this month...having previously only done one or two since I started blogging. I love these cookies, they're so cute! Most people have made stained glass window cookies at some point in their lives...but these are stained glass window, window cookies complete with flake window sills and skittle flowers...you can't go wrong! :-)
They are also my second entry into this month's Random Recipes hosted by Belleau Kitchen. You may have seen in my last post that once a recipe book was randomly selected, there was a choice as to whether to make the first recipe in the book or the last. The book I selected was Hamlyn's 200 Cakes and Bakes and the recipe on the first page was for these delicious Lemon and Limoncello Mini Cupcakes. On the last page...the window cookies.
The cookies tasted lovely, although there are more sweets and chocolate than actual cookie! I'm sure children would love these...and that obviously makes me a big kid as I love them too!

Ingredients

200g chilled unsalted butter
275g plain flour
100g icing sugar
2 egg yolks
2 tsp vanilla bean paste

175g coloured boiled sweets
Royal Icing
10 chocolate flakes
12 skittles or M&Ms, various colours
Sugar sprinkles

To make the dough, dice the butter and then put it in a food processor with the flour and then mix until if forms a breadcrumb consistency. You can then add the egg yolks, icing sugar and vanilla paste before blending again until the mixture comes together in a dough. This should then be chilled for at least an hour, wrapped in cling film

Whilst the dough is chilling, line 2 baking trays with baking paper and unwrap the boiled sweets. Then when the dough is suitably chilled, roll it out quickly on a floured surface. I rolled mine to roughly the thickness of one and half pound coins. From this you should be able to cut out 10 windows, each around 10cm x 8cm. I made a template out of card before I started to make it easier. At this stage the dough was very soft, so I decided to put the baking trays in the fridge covered in cling film for a bout 20 minutes.

After the 20 minutes in the fridge I used a 3cm square cutter to cut out the window panes before popping a boiled sweet into each one. The cookies should be baked in a preheated oven for 12 minutes at 180c/160c fan/gas 4. The sweets will melt and fill the panes, if they don't you can use a toothpick to tease it into the corners, although I didn't find this to be necessary. The cookies can then cool on the baking trays.

Once cool you can add the finishing touches. Use royal icing to attach a flake to the base of each window. This should be right along the very bottom, otherwise the cookies won't stand up. Finally, attach the sprinkles and skittles and use royal icing in a piping back to add the additional details. Then stand your cookies up and your finished!

* Adapted from Hamlyn's 200 Cakes and Bakes

Saturday, May 5, 2012

Cinco de Mayo Pinata Cookies

Cinco de Mayo... English translation...the 5th of May! This is an annual celebration in the USA and Mexico. If you check it out on Wikipedia you'll find that the date is observed in the US as a celebration of Mexican heritage and pride and to commemorate the cause of freedom and democracy during the first years of the American Civil War. In the Mexican state of Puebla, it commemorates the Mexican army's unlikely victory over French forces at the Battle of Puebla on May 5, 1862.
I love these cookies, they're so bright and cheerful and if that wasn't enough there's a hidden surprise. If you can bear to smash into your little burro then you'll find a secret cache of M&Ms!

These cookies require a little effort to make but I think it was worth it, although I won't be whipping them up on a regular basis. The process started with the making of an unusual dough, it had a cup of vegetable oil in and was incredibly soft, yet not sticky. This was then divided into six with copious amounts of food colouring being added to give the characteristic pinata colours.
Once coloured the dough was layered up, one colour on top of the other in a tupperware box before being frozen overnight. To bake, slices of the dough were cut off the frozen block and baked for 12-14 minutes and then immediately upon coming out of the oven the burros were cut out of the slabs. For every two regular donkies, one was cut to make the secret hiding place. I did this with a small circle cutter and sadly his legs and ears also had to be removed! The three parts were then stuck together with a little royal icing with the M&Ms hidden inside first.
Once cut the pinata cookies were a little fragile and there were a couple of limbs lost along the way, leading to a few wonky donkeys...sorry I couldn't resist!
If you want to make your own pinata cookies then the original recipe came from the She Knows website and has full instructions. However, I'd be interested to know if anyone tries this with regular cookie dough and whether this would work just as well? I guess the concept could also be used in all sorts of other cookie creations.
Many people believe that pinatas originated in Mexico, although it has been suggested that the idea of breaking a container filled with treats came from Europe, in particular Spain in the 14th Century where they were used for the celebration of Lent. However, whilst this may be correct, apparently the true origins are Chinese with the Chinese version being in the shape of a cox or ox and being used for the New Year. 

Wednesday, May 2, 2012

Cookie Writing

Last week I attended a two hour 'Cookie Writing' evening class at Cakes 4 Fun in Putney. It was a chance to go along and learn about a variety of different ways to write on and personalise your bakes. Many of these ideas can be used on larger cakes but for ease and due to the limited time, we tried out our new skills on cookies.
As you can see below we used royal icing for piping by hand, this is quite tricky and requires a bit of practice. There were also edible images, if you're feeling really keen you can print these yourself by using purchasing edible ink and using a designated printer for edible images!

Tappits can be used to give a nice uniform finish, as well as regular cutters to give the finish you can see in number 4. Finally, why not just style your own writing out of rolled sugarpaste, or alternatively you can use edible pens to write straight on! All of these suggestions are great ways of adding the personal touch to your cakes and cookies and as always the Cakes 4 Fun team came up with some fab designs and a great colour scheme which ties all the cookies together! 
1. Piping with Royal Icing                                           2. Edible Images

3. Tappits                                                                      4. Cutter

5. Rolled sugarpaste                                                     6. Edible Pen

I don't want to give too much away as if you want to learn more and find out how to use each of the methods properly, I'd definitely recommend going on the course. Cakes 4 Fun always run great classes and the tutors are lovely, so if you're ever in this neck of the woods, give it a go! :-)

Thursday, February 9, 2012

Love Heart Cookies

Following my recent hidden heart cupcakes I thought I'd continue with the heart theme with these really sweet love heart cookies. They're easy to make and you can give them to your loved ones as well as your best girlfriends! For those of a more modern disposition, love hearts have also been updated for the 21st century with messages such as 'text me' now included!

Everyone knows love hearts but you may not be aware that you can actually buy anti-love hearts too... so just in case you want to send a different type of message this Valentine's, here's one for you! As for me I'll stick with cutie pie!
To make these you just need a basic cookie dough recipe, check out BBC GoodFood's recipe here. Once you've made and cooled your cookies, make up some royal icing which you can buy in just add water form at the supermarket. Make it relatively stiff to start and use a 1.5 or 2 nozzle to pipe an outline on top of your cookie.

Once the outline has set a little, make your royal icing a little more runny and make up different colours as required. Fill each cookie with the runny icing using small piping bags with the end sniped off, you don't need a nozzle and you can use the end of the bag to push the icing up to your outline. To add little contrasting hearts, immediately drop spots of a different colour into the wet icing and then quickly drag a cocktail stick through each one... et voila... you have hearts!!
Finally, for added embellishment or to write your message, go back to the stiffer icing and mix it up in quite a bright colour and pipe away!! Who knows, as it's a leap year you may even wish to propose to your other half via the medium of cookies!! ;-)