Showing posts with label Christmas. Show all posts

Saturday, January 5, 2013

Snowy Chocolate Cake Cottages

 
These cottages are really cute and so wintery and they're also a little festive with the wreaths and Christmas trees. 
These were a bit of a labour of love to make, they took a while especially the piping but I was really happy with the result. The first stage was to make a dense chocolate cake. The recipe specified a 6 inch square tin which I don't have so I used some foil backed parchement and tried to reduce the size of an 8 inch tin as you can see above...and it actually worked quite well. If you wanted to make something similar you could use any dense chocolate cake recipe.
Once baked and cooled the cake went in the fridge overnight to firm up so it was suitable for carving. The 6 inch tin produces four cottages.
I carved two types of roof on my cake for a bit of variation. This is also useful if you have different flavour cakes so you can tell which one is which. Another potential cake recipe for the cakes was spiced ginger cake.
Once the cottages were carved they were covered in marzipan to create a smooth base. A lovely chocolate ganache was then poured and spread over the top with a small cranked palette knife.
Warning, the next part will give you hand cramps! This was quite fine piping and I used royal icing in a piping bag with a 1.5 nozzle. I also used an angled turntable to pipe on the sides more easily. First up the roof tiles were piped and some were given extra icing to show a build up of snow. It doesn't matter if they're not perfect as the whole thing gets a dusting of icing sugar on top. Also add some icicles as a finishing touch.
Once the roof was complete it was on to the doors and windows. The snowmen were created by pressure piping a small circle for the head and a slightly larger circle beneath for the body.
Finally, some of the white icing was mixed up to create green, red and yellow for the wreaths, window decorations, Christmas trees and snowmen. The Christmas trees are 3D as the first layer was piped on by zig zagging from side to side with the lines gettting progressively longer to create the shape. When this was dry a slightly smaller zig zag was piped on top and then a final third layer. A star and Christmas decorations were then added to finish the trees off.
Lastly, royal icing was spread over the boards around the cottages and a ribbon added. I think these could even make cute Christmas presents next year! The idea is from the most recent Squires magazine and is by Ayako Saida.

Wednesday, January 2, 2013

Forever Nigella #21 - Christmas Roundup

Well Christmas is over for another year...I hope it's been a good one for you! I've had the pleasure of hosting Forever Nigella for December 2012 and I've really enjoyed checking out all the delicious entries.
I kicked off this month's event with Nigella's sticky gingerbread, it seems this is a Nigella classic as many other people commented to say that they make it and it's one of their favourite gingerbread recipes. I also couldn't resist adding the little deer and trees that Nigella added on her Christmas special a couple of years ago.
Next up the first of three recipes from Sally at Recipe Junkie. Sally made this lovely looking Cranberry and Orange sauce when she found some cranberries lurking in her freezer. I love the addition of orange to this sauce and this would be absolutely delicious with the Christmas turkey.
Liana at My Sugar Coated Life created Nigella's festive Yule Log. Yule Log's have been popular this year and it's easy to see why...all that lovely chocolately sponge and ganache! This was Liana's first attempt and it turned out really well...the log rolled perfectly and she made a couple of changes to the recipe to bring out the chocolately flavour.
Another Sticky Gingerbread from Miss Flash at Food, Glorious Food. This was made from Nigella's Christmas book. Miss Flash also made a few tweaks to her recipe and served it as a pudding with lashings of custard...the perfect winter warming pud!
.
Another Nigella classic next with Christmas Rocky Road from Lisa at United Cakedom. This is the first time Lisa has entered Forever Nigella but it's a great entry...and this Rocky Road also makes a perfect Christmas gift...which Lisa in fact gave to her dentist office!!
Next Rocky Road take two from Mimi at Chef Mimi Blog. Another lovely looking creation and this recipe is a holiday favourite for Mimi and she was well prepared to make it this year, ordering Amaretti biscuits back in August as they can be difficult to come by.
Christmas Pudding Cake using Nigella's chocolate cake recipe from Caroline Makes. Caroline made this after finding some hemisphere moulds in Lakeland. As Caroline isn't so keen on Christmas cake she decided to use a chocolate cake recipe and make it look like a Christmas Pudding complete with holly on top...and it turned out perfectly!
The second recipe from Sally at Recipe Junkie is this Cranberry Jam which is another great idea for using up Cranberries. As Sally says cranberries are full of pectin so they are perfect for making jam. I particularly like the ensuing uses for the jam too...Sally had a little on some homemade brioche and then also used some in a cranberry bakewell tart!
Nigella's Cranberry Cake from Jen at Blue Kitchen Bakes. Jen is a big fan of cranberries. This cake is similar to an upside down cake and I can imagine it is delicious and moist...and another great way to use up cranberries.
The final recipe from Recipe Junkie was this bubble and squeak. I've seen a few bubble and squeak creations around this Christmas but I've never made it myself. However, it seems that it is a great way to use up your Christmas dinner leftovers. It's all the leftover vegetables whizzed up in a food processor to form a chunky puree which is then fried...delicious!
This Apple Chutney from Sinea's Pantry was a lovely Christmas present for her Grandad who loves chutney. There were some modifications to the original Nigella recipe and I can only imagine that this would be delicious with cheese and biscuits and leftover cold meats.
Another lovely looking Buche de Noel from Jude at A Trifle Rushed. Everyone who's made Nigella's Buche de Noel this year has reported that it is easier to make than you might think and it also keeps for a good few days...although as Jude says it probably won't last that long! I particularly love the cute little robin on the top of this log.
We had a last gasp entry from Lucy at Super Golden Bakes who tweeted a picture of her Mini Apple Pies. This pie looks delicious...I'd quite happily devour this with a little custard! Lucy ate hers with ice cream and caramel sauce!
And finally to finish the round up we have a Buche de Noel from Forever Nigella creater Sarah at Maison Cupcake. Sarah had a particularly relaxing Christmas this year after having a new kitchen fitted in 2012 with some mod cons which made it altogether less stressful. Fortunately for us this gave her time to make and blog about this Buche de Noel on Christmas day no less...that's dedication...and she was even finished in time for Downton! :-)
Thank you to everyone who has entered Forever Nigella this month...Christmas is the perfect time for the Domestic Goddess's recipes and I look forward to trying some of these out next Christmas!
January's Forever Nigella will be hosted by Sally at Recipe Junkie...so check out her blog for more details.

Monday, December 24, 2012

3D Cookie Christmas Tree

We're nearly there...it's Christmas Eve and I can't wait for the big day. Here is my final bake before Christmas...a 3D Cookie Christmas Tree. I bought these cookie cutters last year but never got round to making a tree but I'm really glad I made it this year, as it turned out even better than I expected. The cutters are from Lakeland, I've seen them in store this year but can't find them online.
The tree was fairly simple to make, although it was rather time consuming. If you buy the Lakeland cutters it comes with a recipe for a vanilla cookie dough and it is in the right proportions to make all 20 of the cookies. However, you could use any cookie recipe you like, such as this one (although you might have to make double) and you could also make any flavour...maybe spiced or orange for Christmas!
 
This bake was time consuming as you have to chill your dough and I also cooked the trays of cookies one at a time and there were 4 trays. As with any cookies it is also advisable to put them back in the fridge once you've stamped out the shape as this firms them up again and stops them spreading in the oven. If you don't have the Lakeland cutters you could easily still make a cookie tree if you have an assortment of different sized star cutters.
Once all the cookies were cooled I used green sugarpaste and used the cookie cutters to stamp out the paste to top each cookie. It's the little star on top of the tree that makes this bake. It's covered in white sugarpaste and then given a liberal brush over with edible glue before sprinkling with edible glitter, it really does sparkle.
To assemble I covered a small cake board with white sugarpaste and finished with a Christmassy red ribbon. This was then the base upon which to build my tree. I put just a little royal icing between each layer to keep it together and the direction of each cookie was alternated to give the tree effect.
The finishing touches were the large silver balls or dragees on each corner of the star to represent the Christmas decorations and then a final spray with silver lustre dust to add some festive sparkle. This would make a lovely Christmas gift and youngsters would love it!
 
I'm entering my 3D Cookie Christmas Tree into this month's Calendar Cakes where the theme is 'Go Crackers for Christmas'. This month's host is Rachel over at Dolly Bakes and we host alternately. Check out Rachel's blog for more details...we'd love for you to join us!
So all that remains is for me to wish you a very Merry Christmas!

Sunday, December 9, 2012

Christmas Wreath Cookies

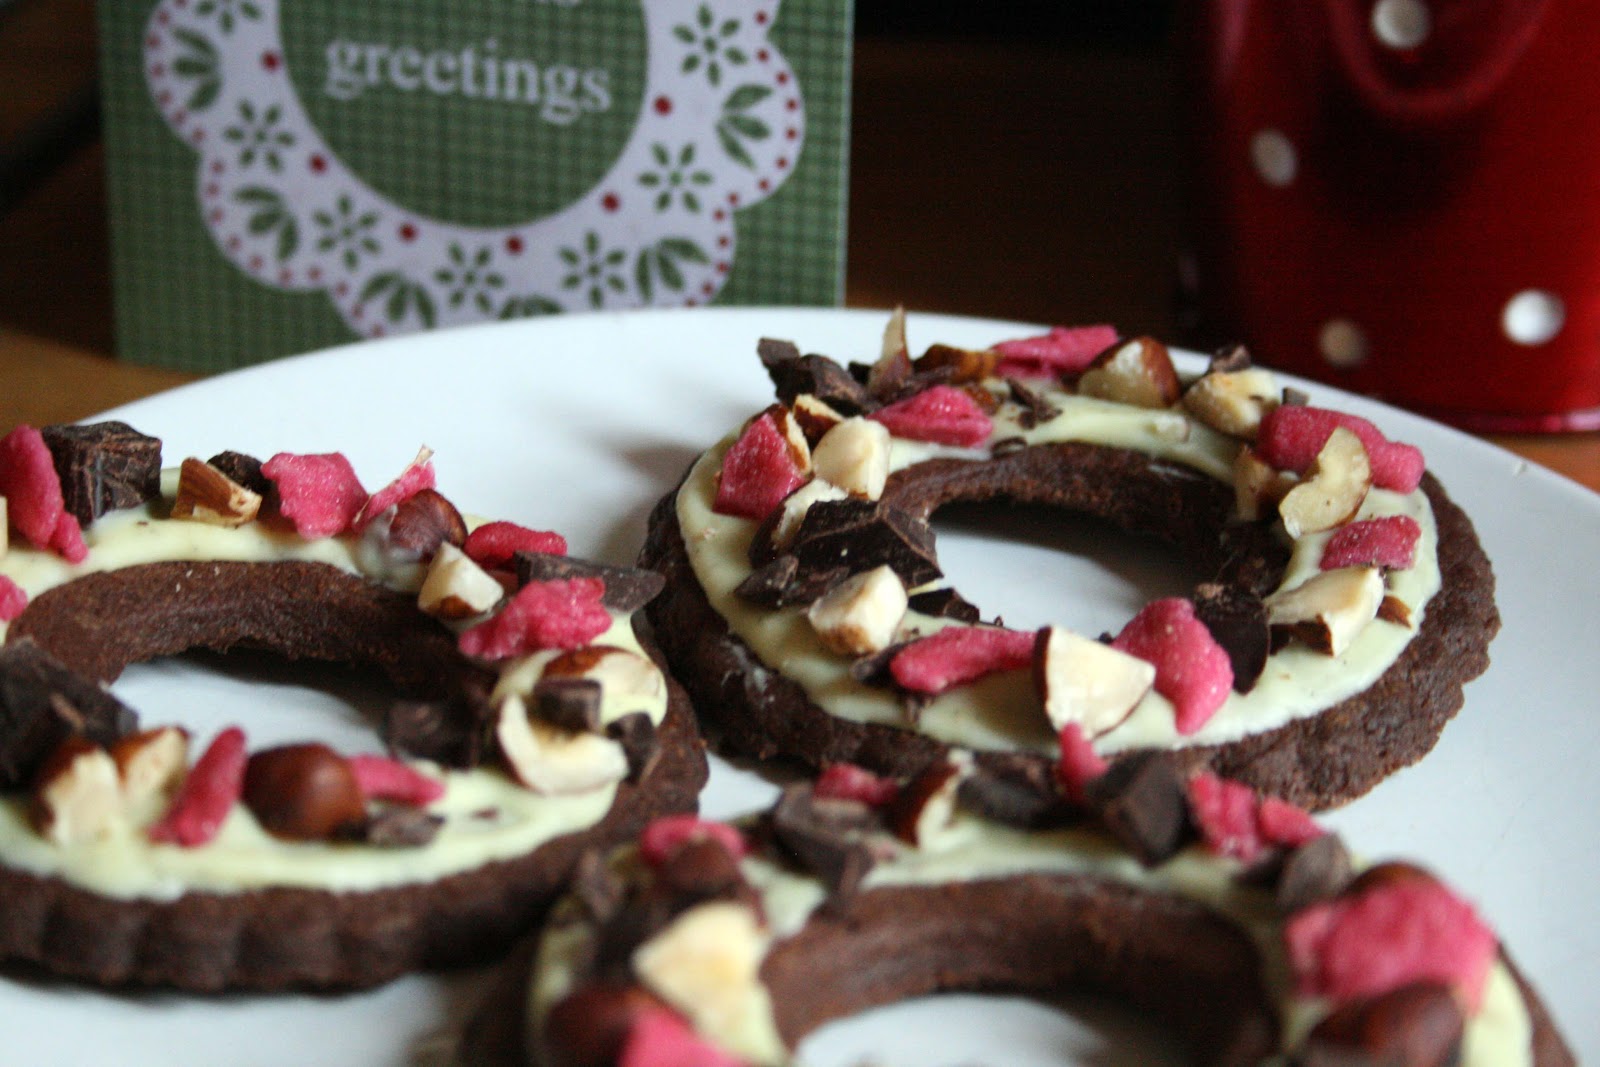
These Christmas Wreath Cookies wouuld be great to serve to any guests that pop round during the festive period or alternatively they'd make really lovely Chirstmas gifts.
You can serve your cookies to guests as they are or alternatively for a bit of fancy presentation you could also thread them with some Christmassy ribbon and then display them on a mini christmas tree or on a twig tree such as the one below designed by David Stark.
These cookies are simple to make. You can use any cookie recipe you like so you can easily vary the flavour to suit your tastes. My cookies are chocolate with a hint of cinnamon but an alternative could be to make vanilla cookies and then melt dark chocolate to contrast.
To cut out the cookies I used an 8.5cm fluted cuter and then cut out a 4cm ring in the centre with a round cutter.
Then to decorate it was simply a case of drizzling melted white chocolate on each cookie. I used a piping bag to put the chocolate on the cookie and then the back of a spoon to spread it around a little, it was quite difficult to get perfect edges. Then whilst the chocolate is still wet each cookie was sprinkled with chopped hazelnuts, dark chocolate and crystallised rose peteals. The rose petals give a lovely contrasting colour to the cookies and they are actually rather tasty! However, a Christmassy alternative to the rose petals could be chopped sour cherries.
The first challenge I'm entering my chocolate wreath cookies into is Tea Time Treats hosted by Karen at Lavender and Lovage and Kate at What Kate Baked. Their theme is chocolate as there is always an abundance of the sweet stuff about at Christmas.
I'm also entering my cookies into this month's We Should Cocoa challenge as I added a teaspoon of cinnamon to the chocolate cookie recipe to give it a bit of festive spice. The theme for WSC this month is cinnamon and chocolate so these modified cookies fit the theme perfectly. I usually a stickler for following recipes to the letter, so adding a little cinnamon in place of a small amount of flour was quite adventurous for me! WSC is hosted by Choclette at Chocolate Log Blog and Chele at Chocolate Teapot.
 
Ingredients

245g plain flour
25g cocoa powder
1tsp cinnamon
250g unsalted butter, chilled and diced
140g icing sugar
2 egg yolks
2 tsp vanilla extract
125g white chocolate, broken into pieces
75g dark chocolate
75g unblanched hazelnuts
Crystallised rose petals

The initial recipe suggested making the cookie dough by hand but I cheated and used a food processor...so you can choose either method! Before you start preheat your oven to 180c/160c fan/
gas 4.

Put the flour, cocoa powder, cinnamon and diced butter into a bowl and rub together until it ressembles fine breadcrumbs...or blitz it in your food processor. Add the egg yolks, icing sugar and the 2 teaspoons of vanilla extract. Mix this in well until you have a smooth dough and then wrap in clingfilm and pop in the fridge to chill for at least 30 minutes.

Lightly dust your work surface with flour and roll out the dough. This recipe makes about 16 cookies. To cut them out use an 8.5cm fluted cutter and then cut out a smaller round circle from the centre of each cookie using a 3 or 4cm cutter. Place the cookies on a greased baking tray or line your tray with greaseproof paper before putting them on. Make sure you leave sufficient space around each cookie.

Place the cookies in the preheated oven for around 15 minutes but make sure you keep an eye on them as they may catch a little before that. They should begin to darken around the edges when ready. Cool on a wire rack.

To decorate, melt the white chocolate in a bowl over a pan of simmering water. Whilst it is melting use a potato peeler to create dark chocolate curls. Once melted the white chocolate should be drizzled around each wreath cookie. I used a piping back to make it easier and neater and then spread the white chocolate with the back of a spoon. When you're happy with this sprinkle each cookie with a mixture of the hazelnuts, dark chocolate curls and rose petals. I would recommend completing one cookie at a time otherwise by the time you come to sprinkling on the top, the chocolate may have already set and then the nuts and so on won't stick.

* Adapted from Hamlyn's 200 Christmas Recipes

Sunday, December 2, 2012

Nigella's Sticky Gingerbread

With the start of December, it's now officially the Christmas season...so bring on the Christmas baking! I'm so excited to have finally made this Sticky Gingerbread...I've only been waiting a year! I just couldn't resist the little deer and the spruce trees...the perfect festive touch.

This is also a recipe from Nigella's Christmas book, so it's ideal to get the ball rolling for this month's Forever Nigella which I'm thrilled to be hosting.
This gingerbread is full of gorgeous flavours including fresh and ground ginger, cinnamon, ground gloves, black treacle and golden syrup. Not only does it taste delicious but it will also fill your house with the wonderful aroma of Christmas.
This is a really easy recipe, all you need to do is melt all the ingredients listed above in a saucepan, along with some dark muscovado sugar and some butter. Once it's all melted together, milk, eggs and some bicarb of soda dissolved in warm water is added and the whole thing bubbles up a little. This mixture is then poured into a bowl containing flour which all gets mixed together...et voila!
It's a very runny batter but that just adds to the lovely sticky nature of this bake. It's soft and light when baked and all the spices come through a treat! Nigella also suggests a frosting of 175g icing sugar, a tablespoon of lemon juice and one of warm water if you're going to make this for a bake sale or some such thing...although she prefers the simplicity of the un-iced version.
If you're making any festive Nigella recipes this month then do enter them into Forever Nigella #21. As mentioned I'm hosting this month but the home of Forever Nigella is at Maison Cupcake. We'd love to see your creations both sweet and savoury!

Ingredients

250g butter
200g golden syrup
200g black treacle
125g dark muscovado
2 tsp finely grated ginger
1 tsp ground ginger
1tsp ground cinnamon
1/4 tsp ground cloves
1 tsp bicarb of soda, dissolved in 30 mls warm water (2 tbsp of water)
250ml full fat milk
2 eggs, beaten
300g plain flour

Preheat the oven to 170c/150c fan/gas 3 and prepare a 20 x 30cm baking tray by lining it with baking paper.

Sift the flour into a large bowl ready for later.

Next melt the following in a medium sized saucepan: butter, sugar, golden syrup, black treacle, cinnamon, cloves and the fresh and ground ginger. When this mixture has melted take it off the heat and add the milk, bicarb of soda with water and the beaten eggs.

These wet ingredients can then be poured on to the flour and the whole mixture should then be beaten until well combined. I ended up with quite a few pockets of flour which I had to beat out. The mixture will be extremely runny but don't fear this is how it is supposed to be. Pour it into the prepared tin and bake for 45 minutes. Mine only took 45 minutes, you don't want to overbake otherwise the gingerbread may lose it's stickiness.

When ready, remove from the oven and place the tin on a wire rack to cool. This recipe will cut into about 20 squares and will keep for up to 2 weeks in an airtight tin. You can also freeze it for  up to 3 months should you so wish.

* Adapted from Nigella Christmas by Nigella Lawson

Saturday, December 1, 2012

Forever Nigella #21 - Christmas

Welcome to Forever Nigella. I'm thrilled to be hosting this month...and the theme is Christmas! Nigella even has a whole book devoted to the subject.

The home of Forever Nigella is at Maison Cupcake. Creator Sarah describes Forever Nigella as 'the only regular blogging event to share your culinary moments dabbling with the domestic goddess'. So be your creation sweet or savoury we'd love it if you could join us for this month's challenge. This may be Laura Loves Cakes but you are most welcome to enter absolutely any Christmassy Nigella recipe...even your Christmas lunch if the recipe came from the domestic goddess herself!
Why not dig out all of your Nigella cookbooks and magazine recipes or check out some online sources and join in with this month's challenge.

Forever Nigella Rules

Forever Nigella #21 is being hosted by Laura of Laura Loves Cakes. This month’s challenge is to prepare and blog any Nigella Lawson recipe which is suitable for Christmas. Forever Nigella is organised by Sarah at Maison Cupcake.

1. Blog your entry by Sunday 30th December 2012:

a) the current Forever Nigella badge
b) a link to this announcement post
c) a link to the Forever Nigella page at Maison Cupcake:
http://blog.maisoncupcake.com/forever-nigella

n.b. posts must have been published since the announcement post. Archived posts need to be re-published afresh if you wish to submit.

2. Remember copyright.

You must NOT reproduce Nigella’s recipes verbatim. Tell us which book it is from and/or link to it online. If you’ve adapted the recipe in some way i.e. changed at least two ingredients or amended the method then it’s ok to publish the a recipe in your post but you MUST write directions in your own words.

3. Submit your post

Use the linky tool or email me at lauralovescakes@yahoo.co.uk cc’ed to sarah AT maisoncupcake DOT com.

The Forever Nigella page shows a list of online Nigella resources, future hosts and links to past themes and round ups.

Tweet your post: #forevernigella @MaisonCupcake @Lauralovesbakes

Saturday, December 24, 2011

A Lovely Little Gingerbread House


Having heard all the stories of blood, sweat and tears whilst making a gingerbread house, it was with some trepidation that I began my construction. There were a few hairy moments along the way (not literally!) but nothing an awful lot of royal icing and sweets couldn't fix! My favourites are the chocolate button roof tiles! The house also comes complete with a gingerbread man in lederhosen!!

Merry Christmas everyone!