Showing posts with label Tea Time Treats. Show all posts

Monday, May 6, 2013

3D Dinosaur Cookies

I've been looking forward to making these 3D dinosaur cookies for a little while now and with a long weekend upon us, it seemed like the perfect opportunity. I bought the cutters from Folly Home, I made the stegosaurus and the T-Rex but you can also get a brachiosaurus and a triceratops!
These do take a little bit of time to make but the end result is worth the effort. They would also make a lovely gift for a little boy!
Each set comes with several different cutters, you need to make each of the cookies and then when they're cool you can fit them all together to make your 3D dinosaur. I used this basic biscuit dough from the BBC as I couldn't find my usual recipe. The cookies tasted great but they were quite fragile so it is important to be really careful not to break any of the pieces. Another tip is to ensure that the little slots on each cookie are suitably opened before baking, if they're too close when they go in then the slots will be too narrow to fit the cookies together. To avoid the cookies spreading too much when baking I put them in the freezer (already cut out) for 5-10 minutes on the baking tray to firm up the butter.
 
One top tip I would recommend is using a cookie spatula. By using the spatula you can easily pick up your cookies without altering the shape, as sometimes the cookies can become misshapen. Also after using a cookie cutter, you may end up with some slightly rough edges, to give a neater finish, pick up the cookie and gently pat down these edges or run your finger around the edge...but be careful not to change the shape again.
You can leave the cookies undecorated but I like the idea of lots of different coloured dinosaurs, so I decorated them using royal icing and the flood filling technique. If you want to know more about how to do this, I previously briefly outlined the process when I made Love Heart Cookies. Once the royal icing on these dinosaurs had set over night, I secured the legs on with a little more icing.
I'm entering these 3D dinosaur cookies into this month's Tea Time Treats challenge which is hosted alternately by Kate from at What Kate Baked and Karen at Lavender and Lovage, this month it's Karen's turn. The theme for May is Biscuits and Cookies.

Tuesday, April 9, 2013

Jaffa Cupcakes

I think I'm yet to meet anyone in life who doesn't like Jaffa Cakes...and as to whether Jaffas are a biscuit or a cake...in this case they're most definitely a cake. If you're interested, apparently the difference between a biscuit and a cake is that cakes go hard when they're stale and biscuits go soft! McVities claim that Jaffa Cakes are indeed cakes...the reason they are keen to define them as such is that you don't have to pay VAT on cakes!

I used the vanilla cupcake recipe from the Hummingbird Bakery's new book 'Home Sweet Home'. It is a great recipe that I've used before and it gives a lovely soft and moist sponge. You can find the recipe here but this version is slightly different from the one in the new book. I've found previously with this recipe that the cakes actually taste better the next day after they're made.
As you can see from the pictures, the cupcakes also have a hidden centre. Once cooled, a little piece of cake was cored out from the centre of each cupcake and then filled with marmalade. I used Robertson's Golden Shredless and it really did taste like the centre of a jaffa cake!
As already mentioned the recipe for these Jaffa Cupcakes is from the new book by the Hummingbird Bakery 'Home Sweet Home'. If you'd like to know more about the book you can read my recent review here.
The icing is chocolate buttercream made with 450g icing sugar, 60g cocoa powder, 150g unsalted butter and 60ml of whole milk. All the ingredients bar the milk are mixed together until there are no large lumps of butter left and then the milk is added in gradually. This is a lovely light icing as there is comparatively less butter than usual and the milk loosens it up.
These cupcakes were easy to make and look cute with the mini Jaffa on top. They were also very tasty and I'd definitely make them again!

I'm entering my Jaffa Cupcakes into this month's Tea Time Treats challenge which is hosted alternately by Kate from at What Kate Baked and Karen at Lavender and Lovage, this month it's Kate's turn. The theme for April is Fairy Cakes, Cupcakes and Muffins.

Sunday, January 20, 2013

Biscuity Lime Pie

Well the weather outside may be cold and dull but this Biscuity Lime Pie will certainly add some zing to your life! It has no less than the zest and juice of 4 limes and a lemon. This is a lovely idea for an easy to make dessert.
The case is made by blitzing ginger nut biscuits and then combining them with some melted butter. This mixture was then pressed into a fluted 10 x 34cm rectangular tin which makes this pie look really pretty and it definitely adds to the appeal. The case was baked on it's own for 15 minutes.
The zingy filling was made using sweetened condensed milk, sugar, egg yolks, the zests and juices from the limes and lemons. It's really hard to describe the result, it tastes quite like lime meringue pie filling but slightly more mousse like! Once the filling is added, it goes back in the oven for a further 20 minutes.
You only need a small slice of this pie, it's very sweet and citrusy but it's guaranteed to tingle your taste buds. It was alittle bit too much for me. If the citrus is a bit too overpowering, you could always reduce the number of limes to 2 or 3. So for a little slice of sunshine on a plate, give this Biscuity Lime Pie a go! :-)
I'm entering my pie into this month's Tea Time Treats as the theme is Citrus. Tea Time Treats is hosted by Karen at Lavender and Lovage and Kate at What Kate Baked. Karen is hosting this month and you can find out more by visiting her blog.
 
Ingredients

300g ginger nut biscuits (I had a 250g pack of gingernuts so I made it up to 300g with digestives)
100g butter
3 egg yolks
50g golden caster sugar
4 limes, zest and juice (this is extremely citrusy, if you prefer you could reduce the limes to 3)
1 lime to garnish if required
1 lemon, zest and juice
397g can condensed milk

Preheat the oven to 180c/160c fan/gas 4. Put the biscuits into a food processor and blitz so you end up with crumbs. If you don't particularly like gingernuts you could make this recipe with digestives. Melt the butter in a saucepan or in the microwave and then pour over the biscuit crumbs. Pulse the mixture until it is combined.

This recipe calls for a 10 x 34cm fluted rectangular tart tin which gives a really professional finish to this pie. Tip the biscuit and butter mix into the tin and press it into the base and up the sides. I ended up pressing it in initially with my fingers and then used the back of a spoon. Bake for 15 minutes until nice and crisp.

Next make the filling by beating the eggs, sugar and lemon and lime zests together in a bowl using an electric whisk. They should double in size. At this point mix in the condensed milk and then add the citrus juices.

Pour the filling into the baked case and then put back in the oven for another 20 minutes. When ready the filling should be just set and there should  be a little bit of a wobble in the middle. Place on the side to cool and set completely before removing from the tin. This needs to be done very carefully as the biscuits are quite crumbly. Chill until ready to serve. Slice to serve and to add aesthetic appeal, top with thin slices of lime.

* Adapted from the BBC GoodFood website

Sunday, December 9, 2012

Christmas Wreath Cookies

These Christmas Wreath Cookies wouuld be great to serve to any guests that pop round during the festive period or alternatively they'd make really lovely Chirstmas gifts.
You can serve your cookies to guests as they are or alternatively for a bit of fancy presentation you could also thread them with some Christmassy ribbon and then display them on a mini christmas tree or on a twig tree such as the one below designed by David Stark.
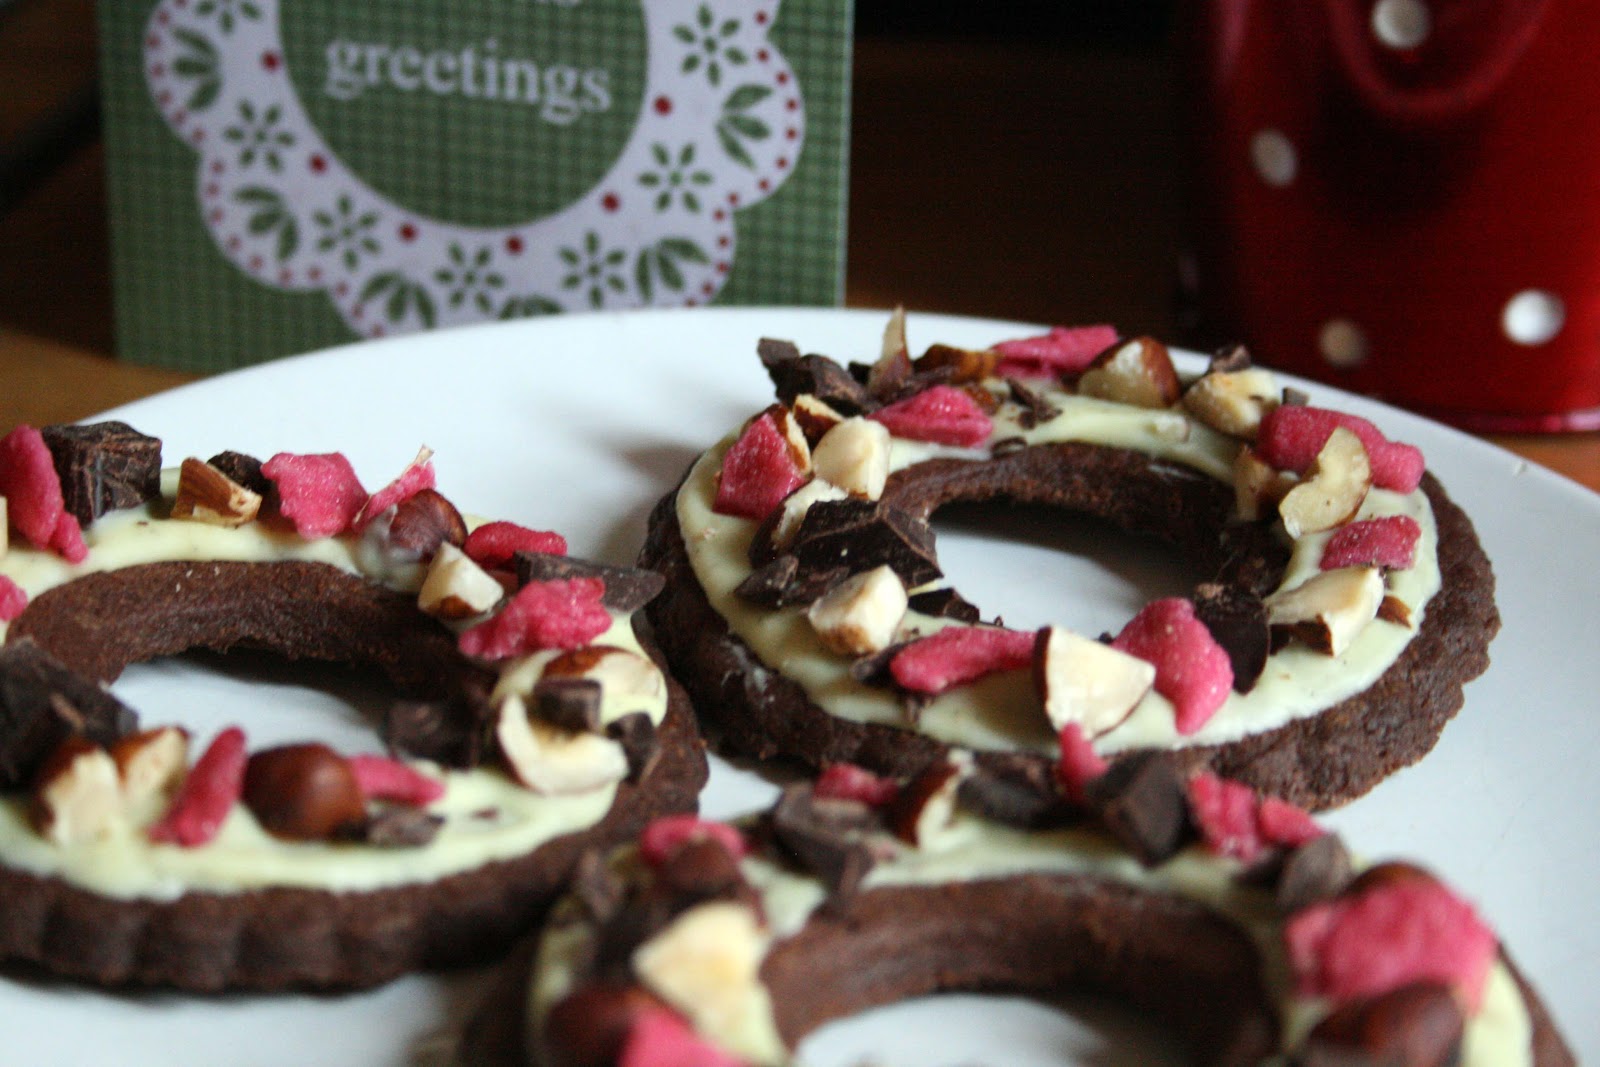
These cookies are simple to make. You can use any cookie recipe you like so you can easily vary the flavour to suit your tastes. My cookies are chocolate with a hint of cinnamon but an alternative could be to make vanilla cookies and then melt dark chocolate to contrast.
To cut out the cookies I used an 8.5cm fluted cuter and then cut out a 4cm ring in the centre with a round cutter.
Then to decorate it was simply a case of drizzling melted white chocolate on each cookie. I used a piping bag to put the chocolate on the cookie and then the back of a spoon to spread it around a little, it was quite difficult to get perfect edges. Then whilst the chocolate is still wet each cookie was sprinkled with chopped hazelnuts, dark chocolate and crystallised rose peteals. The rose petals give a lovely contrasting colour to the cookies and they are actually rather tasty! However, a Christmassy alternative to the rose petals could be chopped sour cherries.
The first challenge I'm entering my chocolate wreath cookies into is Tea Time Treats hosted by Karen at Lavender and Lovage and Kate at What Kate Baked. Their theme is chocolate as there is always an abundance of the sweet stuff about at Christmas.
I'm also entering my cookies into this month's We Should Cocoa challenge as I added a teaspoon of cinnamon to the chocolate cookie recipe to give it a bit of festive spice. The theme for WSC this month is cinnamon and chocolate so these modified cookies fit the theme perfectly. I usually a stickler for following recipes to the letter, so adding a little cinnamon in place of a small amount of flour was quite adventurous for me! WSC is hosted by Choclette at Chocolate Log Blog and Chele at Chocolate Teapot.
 
Ingredients

245g plain flour
25g cocoa powder
1tsp cinnamon
250g unsalted butter, chilled and diced
140g icing sugar
2 egg yolks
2 tsp vanilla extract
125g white chocolate, broken into pieces
75g dark chocolate
75g unblanched hazelnuts
Crystallised rose petals

The initial recipe suggested making the cookie dough by hand but I cheated and used a food processor...so you can choose either method! Before you start preheat your oven to 180c/160c fan/
gas 4.

Put the flour, cocoa powder, cinnamon and diced butter into a bowl and rub together until it ressembles fine breadcrumbs...or blitz it in your food processor. Add the egg yolks, icing sugar and the 2 teaspoons of vanilla extract. Mix this in well until you have a smooth dough and then wrap in clingfilm and pop in the fridge to chill for at least 30 minutes.

Lightly dust your work surface with flour and roll out the dough. This recipe makes about 16 cookies. To cut them out use an 8.5cm fluted cutter and then cut out a smaller round circle from the centre of each cookie using a 3 or 4cm cutter. Place the cookies on a greased baking tray or line your tray with greaseproof paper before putting them on. Make sure you leave sufficient space around each cookie.

Place the cookies in the preheated oven for around 15 minutes but make sure you keep an eye on them as they may catch a little before that. They should begin to darken around the edges when ready. Cool on a wire rack.

To decorate, melt the white chocolate in a bowl over a pan of simmering water. Whilst it is melting use a potato peeler to create dark chocolate curls. Once melted the white chocolate should be drizzled around each wreath cookie. I used a piping back to make it easier and neater and then spread the white chocolate with the back of a spoon. When you're happy with this sprinkle each cookie with a mixture of the hazelnuts, dark chocolate curls and rose petals. I would recommend completing one cookie at a time otherwise by the time you come to sprinkling on the top, the chocolate may have already set and then the nuts and so on won't stick.

* Adapted from Hamlyn's 200 Christmas Recipes

Wednesday, May 23, 2012

Flowerpot Cakes

Feeling a bit bored today? Why not try my new game...'Spot the Cake'...what do you mean it's not that difficult!?!
These little flowerpot cakes are really cute and can be scaled up to a full size cake...maybe for your Aunty's birthday or Mother's Day perhaps! Rather appropriately the cake inside is a mud cake, so when you cut into them you get to see the earth.
The mud cake was made as a large square cake which I cut into layers and then used a cutter to give several large circles which were stacked on top of each other and sandwiched with buttercream. I then carved into the cake to give the tapered flowerpot effect. Next the whole thing was coated in buttercream before covering with paste (teddy bear brown with a little orange paste and some red colour to give the terracotta colour).

The pots were covered upside down and then turned upright, to cover the top a large circle of dark brown paste was stuck on and finally a strip of the terracotta to give the flowerpot effect.
These flower pots are my entry into this month's Tea Time Treats as the theme is 'Floral'...perfect! However, I apologise to all the horticulturalists out there...I'm not sure my flowers are entirely identifiable...the cutter for the purple flowers simply says 'blossom' and the paste colour is African Violet. Although, I'm sure Alan Titchmarsh wouldn't mind! Tea Time Treats is hosted by Karen at Lavender and Lovage and Kate at What Kate Baked, check out their blogs to find out more.
I decided to make two different types of flowers. The first one, the rolled roses is the simpler option and doesn't require any specialist equipment. You just need to take some of the pink sugarpaste and add some CMC about an hour before you want to use it, this will strenthen it up. Then roll out a length of paste in a strip, then fold this in half lengthways. Some people like to put glue down the length too, to stick the ends together. To roll the flower, simply tuck over the first corner (see picture) to form the bud and then just roll. If there is any excess at the back when you've finished you can simply cut it off.

For the leaves I just cut out circles of green paste and pinched each end into a point...simples!

To make the purple blossoms, I used a blossom cutter and impression mould to add detail and then dusted with African Violet to add depth. The leaves were made using a PME plunge cutter and veiner...and the finishing touch, three dots of yellow royal icing piped into the centre of each flower.
Following the crown cake on the postbox, I thought I could take my flower pots to the Chelsea Flower Show this week for a spot of #caking...they'd fit right in! :-)

Sunday, March 25, 2012

Crunchy Citrus Ricotta Scones

This month's theme for Teatime treats is Scones which is quite fortunate as scones are one of my all time favourite things...give me an afternoon tea with jam, clotted cream and a cuppa and I'm happy...incidentally the scones have to be fruit but that's another story! However, it would be a fairly boring challenge if everybody made run of the mill scones...we were encouraged by the teatime treats hosts, Lavender and Lovage and What Kate Baked, to think about slightly more unusual offerings.
I didn't go as far as savoury scones as I'm all about the sweet things in life but I did make a slightly unusual crunchy citrus scone with the main ingredient being ricotta cheese. Sounds like a very strange combination but I can confirm that they were indeed crunchy and citrusy...with no hint of the ricotta! The recipe also produced a scone round as opposed to individual scones. The crunchy part comes from a liberal sprinkling of demerara sugar on top before baking.
Although, these scones won't be winning any beauty contests they tasted pretty darn good, especially whilst still warm and with a little lemon curd....so who cares! :-)
Ingredients

175g ricotta
Zest of 1 orange - finely grated
100g golden caster sugar
200g self-raising flour
50g  butter
1-2 tbsp milk
1tbsp demerara sugar

Heat the oven to 200c/180c fan/gas 6. Mix the ricotta, orange zest and half the caster sugar in a bowl until well combined. In another bowl, sift the flour and add the other half of the caster sugar, finally add the butter which should be cut into small cubes. You should then rub this flour mixture together until it resembles fine bread crumbs.

Add the ricotta mixture to your flour mix and bring it together to form a dough, you can add the milk at this stage if necessary but be careful not to make the dough too sticky. Turn the dough out onto a floured surface and knead a couple of times, so it is not so craggy but don't over knead. The dough should then be pressed out to a depth of 4cm and form it into a neat round.

Then using a knife mark 6 wedges across the top. Finally, brush the scone with milk and if necessary sprinkle a little flour on top before sprinkling over demerara sugar to give the crunchy top. Bake for 20-25 minutes until brown on top.

These scones taste delicious warm and served with a little lemon curd. Enjoy!

* Adapted from BBC GoodFood

Monday, February 13, 2012

Champagne & Raspberry Cupcakes

As Valentines is drawing near, here is another super stylish cupcake to share with your sweetheart! Alternatively, if you're single...or just plain greedy (like me) then you can enjoy this luscious sweet treat at anytime!!
It was my birthday recently and I was lucky enough to receive a bottle of Champagne, so I thought I would put it to good use with these cupcakes...a few glasses may also have been consumed in the making...for quality control purposes of course!!
The actual cupacake was made as normal with 3 tablespoons of Champagne added. For this recipe I used an ice cream scoop for the first time to put the mixture in the cases...it worked amazingly well, highly recommended! Once cooked and cooled, an apple corer was used to take a core out of the middle of the cake, which was then filled with a mixture of raspberry jam and Champagne before placing the core back in!
Finally, the frosting is buttercream with the addition of...yes you guessed it...Champagne!! I piped it on using a star nozzle and then as a finishing touch I made my own filigree chocolate hearts and added a raspberry to give a stylish and romantic finish! I've been wanting to make the chocolate hearts for a while and will add another post with instructions soon.
The recipe for these cakes came from Stylist magazine and can be found here. Also check out Cakeboule's blog for another baking recipe using Champagne Why not make some for your Valentine...if you can resist the urge to eat them all yourself before they get to the intended recipient!

These cupcakes are also my entry for Tea Time Treats hosted by What Kate Baked and Lavender and Lovage. The theme this month is Romance, so these cupcakes fit perfectly with the pretty chocolate filigree hearts and with the champagne and raspberry!